Hosting a static site in AWS for cheaper than a cup of coffee
![]()
Table of contents
The Components
These are the main pieces used to build this website. If you’re here, you probably already know what these three components are. If you don’t, here’s a brief overview and linked documentation if you need to read into it further. This is a very cheap, fast, and fairly easy way to host a static website.
Hugo
According to their site:
“Hugo is a fast and modern static site generator written in Go”.
A static site generator is a tool that takes simple text input + markup language, and generates an renderable HTML file. This makes building static content much faster and simpler, because you don’t have to build out content using HTML/CSS syntax. Although if you’re not happy with certain aspects of your site, editing the “theme” or template is as simple as browsing to the CSS or HTML file and tweaking something there if necessary. But for the most part, you’re just writing simple text (like I am now). The exception is when you want to use markup to format your text. I personally use this cheat sheet to reference markup occasionally.
AWS S3
AWS S3 is a service provided by Amazon Web Services (AWS). It’s basically just flat object storage, organized into “buckets” which is the name of the container of data. Its role here is just a place to store our Hugo-generated HTML/CSS and static objects somewhere where CloudFront can find them. It’s perfect for simpler static sites because it’s incredibly cheap (like less than a dollar a month for most sites cheap) and super easy to configure/deploy. You can read more about it here.
CloudFront
CloudFront is a CDN service, native to AWS as well. It’s serving two roles here:
- CDN to serve our code stored in S3
- Negotiating and building SSL
A CDN is a Content Delivery Network. It’s basically a service that caches our served site from S3 on servers distributed all over the globe, and those servers act as proxies between your browser and where the code is permanently hosted. So when you browse to this site, instead of browsing directly to the S3 bucket to request a webpage, you’re actually just communicating with CloudFront which is serving you the cached version. Why is this necessary? Well one of the downsides of S3 is it’s fairly slow to load. It also doesn’t support HTTPS if you’re hosting a static site in a bucket. So CloudFront can be used as a way to cache the site on a server that’s much closer to you, and also do all of the SSL building via a configured certificate. You can read more about it here.
Honorable Mentions (Not required, but kinda cool)
Zoho email service
Zoho is one of the few legitimate business suite services that has a completely free tier. Their Forever Free Plan costs nothing as long as you stay under their 5GB/25MB attachment limit, which is still fairly generous. Got cash to burn? They offer a “Mail Lite” plan for a whopping $1 a month, but it comes with a myriad of additional features. Most bloggers and small businesses even, will get by just fine with the free plan. Their mobile app makes it easy to check mail as well.
Route 53 DNS
If you’ve bought your domain already, there’s a good chance you’ve probably already setup or plan to use the domain registrar as your DNS resolver too. I was in that boat when I bought my domain from GoDaddy like many times before. Until I tried Route 53, which is the DNS service hosted on AWS. Using their DNS service made the whole setup much easier. This isn’t free (.50 cents per DNS Zone) but pretty dang close, as long as you’re not getting millions of resolutions for your site a month. Even then, it’s very affordable (less than a dollar a month).
All-in-all, all the above costs about .60 cents to a dollar to host per month (depending on site size and popularity). Yes. Less than a dollar per month for a modern, fast, static website. And the first year in AWS is free. This INCLUDES having a custom email address with your domain.
Step-by-step Guide
These guides from AWS are pretty helpful if you get stuck somewhere to help fill in any gaps.
Hosting a Static Site in S3
Using CloudFront to Serve HTTPS for your S3 bucket
Setup S3
-
Login to your AWS console and browse to the S3 portion. Create a bucket a bucket with the same name as the domain you’ve purchased (i.e. sabersecurity.io).
-
For the region, it’s generally best to keep this the same throughout your AWS account to avoid confusion/complexity. Just choose one that’s closest to you and stick to that.
-
Under the public access for the bucket, uncheck “Block all public access” (we want to allow our site to be reachable by the internet).
-
Leave the rest and hit create. Your bucket should be provisioned. Now click your bucket and head over to “Properties”.
-
Near the bottom, click edit on “Static website hosting”. Enable this, and set the index document to “index.html” then save.
-
Lastly for your bucket setup, go to the “Permissions” tab and click edit on your Bucket policy. We want to set the policy to allow it to be readable by anyone (replace my site with yours, leave the rest):
{
    "Version": "2012-10-17",
    "Statement": [
        {
            "Sid": "PublicReadGetObject",
            "Effect": "Allow",
            "Principal": "*",
            "Action": "s3:GetObject",
            "Resource": "arn:aws:s3:::sabersecurity.io/*"
        }
    ]
}
Request SSL Certificate
-
Browse to Certificate Manager in AWS to request a certificate for your site. This isn’t required but highly recommended if you want anyone to trust your website.
-
Click “Request”. Then public certificate. In the certificate details, for the FQDN make this identical to your site name (i.e. sabersecurity.io). Also add another name with your same domain but “www.” in front. Then click Request.
-
For Validation method, select DNS validation if you own your domain and have access to DNS settings in the registrar (or using Route 53).
- NOTE: If you have your domain on a different registrar than AWS, but want to use Route 53 for DNS, I recommend moving your designated name servers first before continuing. If you use GoDaddy, follow this guide. Otherwise just search “migrate nameservers from x to Route 53” on Google.
-
A message at the top will appear, if you click on it you can see the status of your cert request. We want to take the CNAME values provided and enter them into our DNS settings on our registrar/Route 53. If using Route 53, just click “Create Records in Route 53” and it will do this for you (this is why I recommend just using Route 53).
-
Once the CNAME records are added to your DNS settings, it will take a few min usually to verify your ownership of that domain, and the certificate be approved.
Setup CloudFront CDN
-
Browse to CloudFront in the AWS console. Click “Create Distribution”.
-
Fill out the following fields, leave the rest blank/default, then click Create:
-
Origin domain: Go back to your S3 bucket properties in a seperate tab, at the bottom where we enabeld static hosting copy the url to your site. It should look like http://sabersecurity.io.s3-website-us-east-1.amazonaws.com. Paste this url into the Origin domain field.
-
Viewer protocol policy: Redirect HTTP to HTTPS.
-
Alternate domain name (CNAME): input the same two CNAME records you used for your certificate request.
-
Custom SSL certificate: If your certificate request has been approved, you can click the drop-down and select it.
-
Default root object: index.html
-
You should now have a CloudFront distribution generated. It can take 20 or so minutes for it to be enabled.
-
Once enabled, click on the distribution ID, and copy the distribution domain. We want to create two A records in our domain’s DNS settings with this domain pointing to our purchased one. They should look something like this:
https://imgur.com/a/cPvAmPh
- NOTE: If using Route 53, you will have to make this an “Alias”, because usually A records are used for domain -> IP translation.
Create and upload your site
- At this point, your cloud infrastructure should be up and running, and is just waiting for something to serve to browsers. You can test it by saving a file as
index.html with the following contents and uploading it to your S3 bucket:
<!DOCTYPE html>
<html>
    <head>
        <title>Test</title>
    </head>
    <body>
        <p>Your site is working!</p>
    </body>
</html>
-
Once the file is uploaded, browse to your website URL and it should render the text in the code above. If it doesn’t work, you may have to do some additional troubleshooting and double checking the linked AWS articles above.
-
If it’s working, and you’re planning on using Hugo, you can now browse to the Themes page and pick out a theme that suits your website purpose.
-
I can’t do a better job than Hugo already has at documenting their simple setup process, so just follow that here (it’s super easy): https://gohugo.io/getting-started/quick-start/
-
Once your site is setup, and you’ve run Hugo -D to build it and generate the “Public” folder in your site directory, browse back to S3 and upload all the contents of that Public folder (not the folder itself). This should include the key index.html file that your CloudFront distribution is looking for.
- NOTE: If you ever make changes to your S3 contents, you will have to invalidate your CloudFront cache to serve the new content. This is because CloudFront only caches every 24hrs or so, and will not check your S3 bucket for changes for a while. To do that follow these steps. You can invalidate 1000 objects a month before you start gettings charged for it (even then it’s super cheap).
-
Once uploaded, it make take a second for everything to get cached and ready to go. But now you should be able to browse to your site URL and see your brand new shiny site in all its glory!
If you have any questions, or something is out-of-date here, feel free to email ivan@sabersecurity.io
Posted 11/10/2022
Threat Modeling AI Apps
![]()
Table of contents
Why Threat Modeling Still Matters
Threat modeling is just structured thinking about how a system can be abused, and at a practical level we’re trying to answer a few simple questions:
- What are we protecting?
- How can an attacker reach it?
- What can go wrong at each step?
- What controls do we have (or need)?
- If we can’t prevent it cleanly, how do we detect and respond quickly?
For detection engineers this is huge, because instead of writing detections from random ideas (or only from previous incidents), we can build detections from known attack paths in our own environment and get better coverage with fewer “interesting but not relevant” detection rules.
When Prevention Isn’t Possible
“Prevent everything” sounds great on paper, but production systems are messy.
A few common reasons preventive controls fall short:
- Business friction: hard blocks can break critical user workflows.
- Legacy constraints: older systems can’t support modern controls quickly.
- Third-party dependencies: we don’t fully control external services.
- Operational tradeoffs: strict controls can create reliability pain.
- Model uncertainty: LLM behavior is probabilistic, so hard prevention isn’t always deterministic.
This gets even more real in agentic AI systems - we should absolutely use guardrails, system prompts, policy checks, and least privilege, but teams still need to prepare for bypass attempts, indirect prompt injection, tool abuse, and data exfiltration patterns that slip past prevention. That’s where detection engineering acts as a compensating control.
Threat Modeling for Detection Engineering
A good model should create detection work, not just documentation.
One pattern that works well:
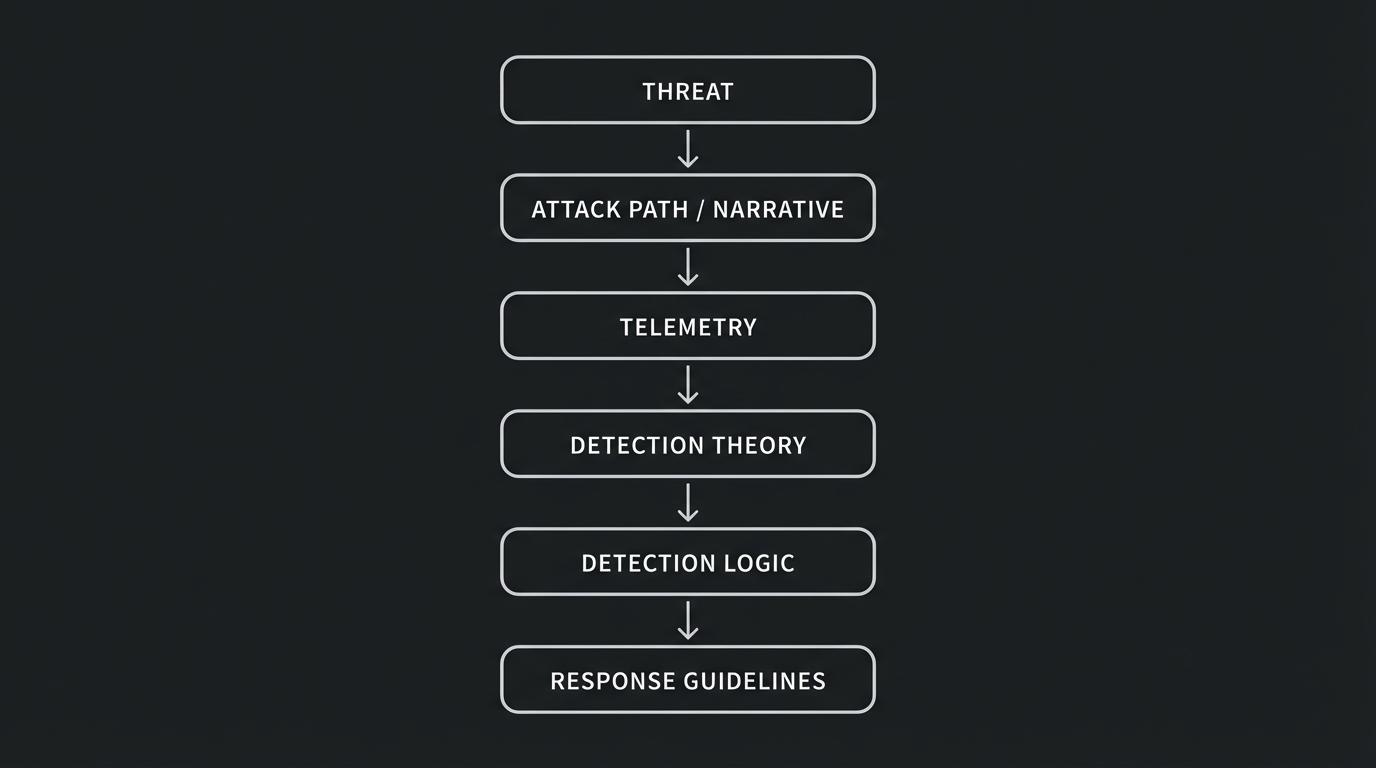
If you can fill in each stage you have something actionable.
Example:
- Threat: indirect prompt injection through untrusted retrieved content, such as malicious instructions embedded on a fetched website.
- Attack path: attacker plants malicious instructions on a compromised website, agent ingests it, and then performs unintended sensitive actions.
- Telemetry: HTTP request/fetch logs (URLs visited by the agent), retrieved content/payload logs, prompt and completion metadata, tool invocation audit logs, session identity and auth events.
- Detection theory: using the telemetry we have, how can we detect the attack narrative at various stages of the attacker’s path?
- Detection logic: alert when anomalous or malicious instruction-like content is retrieved and sensitive tool calls follow soon after.
- Response: revoke credentials/tokens if needed, quarantine source, investigate timeline for RCA and blast radius.
Prioritization That Actually Helps
I like a simple framework that’s easy to follow:
- Impact
- Likelihood
- Preventability gap
- Detectability with current telemetry
High impact plus high likelihood plus low preventability is the sweet spot for incentive to get detections out ASAP.
A Practical Threat Modeling Workflow
Keep it lightweight and repeatable - a model you actually use beats a perfect model you never update.
1) Define scope and critical assets
Pick one clear workflow or feature boundary.
For AI apps, common assets include:
- internal documents and user data
- API keys and service credentials
- tool/action permissions
- system prompts and policy context
- downstream systems (ticketing, email, CRM, code repos)
2) Diagram system and data flows
Map how data and actions move:
- user input
- retrieval (RAG/vector/search)
- model runtime
- tool calls
- external integrations
- logging/monitoring pipeline
This is where attack paths become obvious.
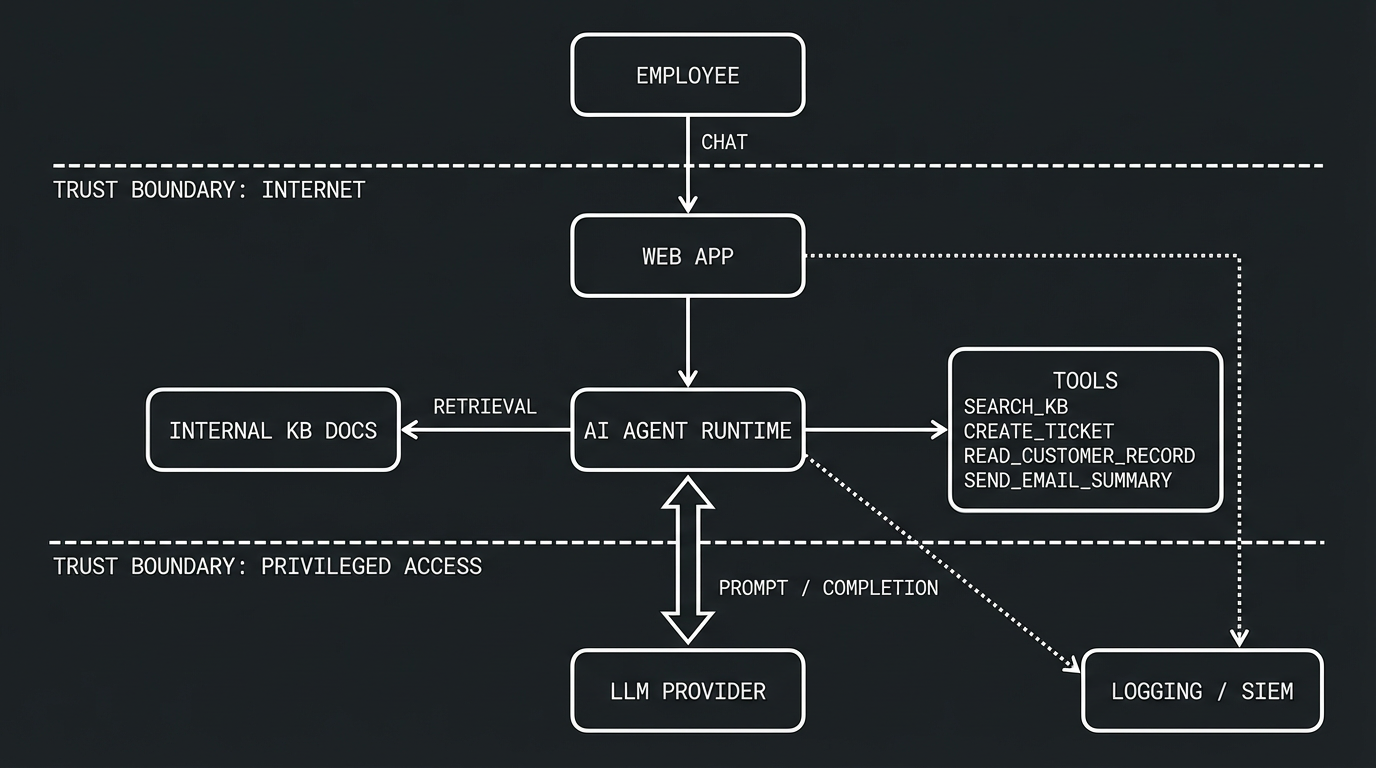
3) Identify trust boundaries
A trust boundary is any point in the system where the level of trust changes between two components. In other words, it’s where data or control crosses from one security context into another, like when an unauthenticated internet user’s input reaches your backend, or when your agent runtime calls a privileged tool that can read customer records. Every time data crosses a trust boundary, we should be asking: “what could go wrong if this input is malicious or this component is compromised?”
Trust boundaries are critical for detection engineering because they’re natural instrumentation points - if you can log and inspect traffic at each boundary crossing, you have visibility into where attacks transition from one stage to the next.
Typical boundaries for agentic systems include:
- internet user to app backend (untrusted input enters the system)
- app to retrieval/indexed content sources (content from external or shared sources could be poisoned)
- app to LLM provider (prompts and completions cross an external API boundary)
- agent runtime to privileged tools (the agent escalates from reasoning to action with real-world impact)
- app to customer data stores (access to sensitive data that could be exfiltrated)
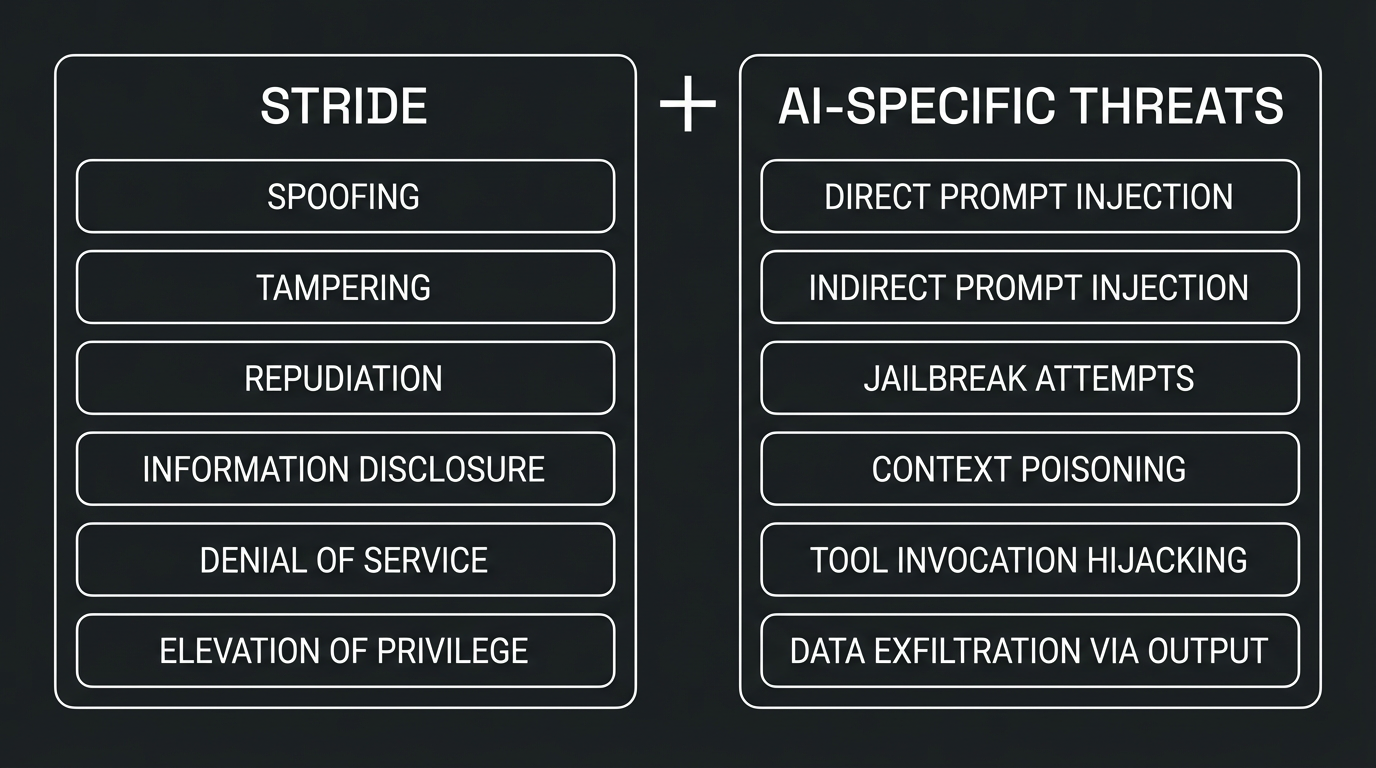
4) Enumerate threats with STRIDE (plus AI-specific abuse)
STRIDE still works well, and for AI systems we layer on additional abuse patterns:
5) Decide controls (preventive and detective)
For each threat:
- what can we prevent now?
- what can we partially or are very limited in preventing?
- what must we detect and respond to?
Make detection outputs explicit and avoid leaving this as a vague “SOC will monitor it” note.
6) Prioritize and assign owners
Turn findings into backlog items with owners across:
- app engineering
- platform/security engineering
- detection engineering
- SOC/IR
Revisit the model when architecture changes, tools are added, or major incidents occur.
The Microsoft Threat Modeling Tool is a great option because it’s free, structured, and fast to adopt. It gives teams a good out-of-the-box solution to start visualizing an application’s architecture.
Practical Setup Flow
- Create a model and lock scope to one workflow.
- Build the DFD (entities, processes, stores, flows).
- Add trust boundaries.
- Generate threats (the tool does this automatically based on your DFD) and triage the results, since not every generated threat will be relevant to your environment.
- Tag each threat as
Prevent, Detect, Respond, or Accept.
- Export and convert high-priority findings into implementation tickets.
Keeping Signal High
- model reality, not ideal architecture
- split giant systems into smaller models
- involve app owners in triage
- prioritize high-impact abuse cases first
Worked Example: Agentic AI Support Assistant
Let’s use a simple scenario that mirrors a lot of real-world internal AI deployments.
Scenario
An internal support assistant has agentic capabilities:
- employees chat through a web app
- app uses an LLM and retrieval from internal KB docs
- agent can call tools:
search_kbcreate_ticketread_customer_recordsend_email_summary
- app logs prompts, responses, tool calls, and auth events
Threat Focus: Prompt Injection Flavors
Direct prompt injection
User attempts to override policy directly in chat input (for example, asking the model to ignore controls or expose hidden instructions).
Detection ideas:
- detect jailbreak/bypass language patterns
- alert on high-risk prompt score plus sensitive tool invocation
- baseline repeated bypass attempts by user/session/source
Indirect prompt injection
Malicious instructions are embedded in retrieved documents and influence tool selection or output behavior.
Detection ideas:
- scan retrieved chunks for instruction-like markers
- correlate risky retrieval with privileged tool calls
- alert when post-retrieval behavior deviates from baseline
Context poisoning / memory abuse
Attacker attempts to persist malicious context so that future responses and agent decisions drift from intended behavior.
Detection ideas:
- monitor writes to memory/state with policy-aware rules
- alert on abrupt shifts in agent decision patterns
- version and diff memory/state artifacts for suspicious changes
Prompt manipulation nudges the agent into technically valid but abusive tool usage, like bulk reading customer records under the guise of a summary request.
Detection ideas:
- detect unusual tool chains (sequence + timing)
- alert on role-to-action mismatches
- detect argument volume anomalies for sensitive tools
Data exfiltration through model output
The model is coerced into disclosing sensitive context or data returned by tool calls in its response to the user.
Detection ideas:
- run DLP-like checks on model output streams
- alert on credential-like, token-like, or PII-heavy responses
- correlate exfil indicators with earlier sensitive tool access
Example Detection Backlog
-
Detect risky retrieval-to-tool chain in a short time window.
An attacker plants malicious instructions in a document or webpage that gets retrieved by the agent, and shortly after the agent invokes a sensitive tool it wouldn’t normally call in that context.
-
Detect bypass campaign behavior across users/sessions.
A user (or multiple users) repeatedly attempts prompt injection or jailbreak variations in a short period, probing for a technique that slips past guardrails.
-
Detect anomalous privileged tool usage by role.
A user’s session triggers tool calls that don’t match their role or typical usage pattern, like a help desk employee’s session bulk-reading customer records it normally never touches.
-
Detect sensitive data exfil indicators in model output.
The model’s response contains credential-like strings, PII patterns, or unusually large volumes of sensitive data that suggest the prompt coerced it into leaking context or tool-returned information.
-
Detect suspicious memory poisoning followed by behavior drift.
An attacker writes or modifies persistent agent memory/state in a way that causes future sessions to behave differently, such as silently skipping policy checks or routing actions to unintended targets.
-
Detect anomalous command execution on the underlying infrastructure.
An attacker chains prompt injection into tool calls that lead to suspicious command execution on the underlying host or platform, indicating activity like persistence mechanisms or data exfiltration.
Tie Each Detection to Response
Detection without response is only half a control, so map each detection rule to concrete actions:
- terminate suspicious sessions
- revoke or rotate impacted credentials
- temporarily disable high-risk tools (likely hard to do without a very high severity incident + CSO)
Closing Thoughts
Threat modeling for AI systems doesn’t need to be heavyweight to be useful, and done well it gives detection engineering a clear map of where attackers can push, where prevention is weak, and where monitoring needs to be strongest.
If you can’t fully prevent a path today, that doesn’t mean you’re stuck - it means we define the path, instrument it properly, and build response-ready detections that reduce blast radius.
Posted 01/19/2026
